


All Products
-
Car Suspension Mount
-
Steering Suspension Components
-
Car Shock Absorber
-
Brake Master Cylinders
-
Drum Brake Shoes
-
Automotive Wheel Bearings
-
Vehicle Spare Parts
-
Clutch Cover Plate
-
Suspension Ball Joints
-
Steering Rack Gearbox
-
Inner Outer Tie Rod End
-
Steering Rack Boot
-
Power Steering Pump
-
Disc Brake Pads
-
Auto Engine Parts
-
 Andrea MontagnaHi Lee,I would like to get 1000pcs of Hliux vigo front shock from last conversation. I know business will be very busy once we finish Quarantine this May.Everything will going again. I would like for shock absorber be produced during this period so when things open I could have in shipment or soon to be received.Thank you.
 -
Seium HossainHi Leo, Thanks, All brake shoes and brake pads arrived in good condition and were just what we required.
-
Andresproducto muy,supera mis espectativas.Gracias!
-
Jose BurgVery nice! The product quality is very good! The packing is beautiful!
-
Laura FernándezBuscaba una pieza difícil de encontrar y la tenían en stock. El envío fue rápido y el embalaje muy seguro. Volveré a comprar.
-
Andrés MoraAtención al cliente excelente, me ayudaron a confirmar la compatibilidad antes de comprar. El producto funciona de maravilla.
-
Nicolas BernardJ'ai comparé plusieurs sites avant d'acheter, celui-ci offrait le meilleur rapport qualité-prix. Je ne suis pas déçu.
-
Antoine LefèvreCommande expédiée vite, suivi de livraison carré. La qualité est au rdv. Franchement, bonne expérience.
-
Sébastien RouxRien à redire, tout est parfait. La livraison rapide, le produit conforme, et en plus j'ai eu un petit conseil par téléphone. Au top.
Nissan NV350 Caravan E26 Front Headlight Assembly 2012
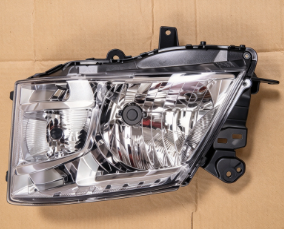
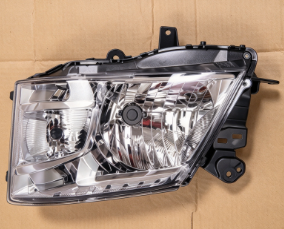
| Place of Origin | CHINA |
|---|---|
| Brand Name | confidential |
| Certification | TS16949 |
| Model Number | Nissan NV350 Caravan E26 Front Headlight Assembly |
| Document | Nissan NV350 Caravan E26 Fr...12.pdf |
| Minimum Order Quantity | 10pcs |
| Price | whole price |
| Packaging Details | brown box |
| Delivery Time | 5-8work days |
| Payment Terms | L/C,D/A,D/P,T/T |
| Supply Ability | 35000pcs-40000pcs/month |
Product Details
| Compatible Models | Nissan NV350 Caravan E26 | Product Type | Front Headlight Assembly |
|---|---|---|---|
| Production Years | 2012 | Position | Front Left Or Right |
| Material | ABS Plastic | Fitment Note | Verify Specific Fitment Via VIN Before Ordering |
| Highlight | Nissan NV350 front headlight assembly,2012 Nissan Caravan headlight,E26 headlight assembly with warranty |
||
You can tick the products you need and communicate with us in the message board.
| issan NV350 Caravan E26 Front Headlight Assembly |
|---|
Product Description
Core Product Description
The Front Headlight Assembly for Nissan NV350 Caravan E26 is a complete front lighting unit designed for the E26 generation. This headlight combines low beam, high beam, turn signal, and position light functions in a single housing.
⚠️ Important: The NV350 Caravan E26 uses different headlight configurations depending on grade and production period. Please verify specific fitment via VIN before ordering.
DIY Diagnosis Guide
How to Tell If Your Headlight Needs Replacement:
Look for these common signs:
-
Cracked or broken lens – Visible cracks, holes, or missing pieces in the lamp housing
-
Moisture inside the lens – Condensation or water droplets inside the headlight
-
Non-functioning lights – Low beam, high beam, or turn signal not illuminating
-
Faded or discolored lens – Lens appears cloudy, yellowed, or sun-damaged
-
Loose or damaged housing – Headlight rattles or is not securely mounted
💡 Quick inspection: Turn on the headlights and test low beam, high beam, and turn signal functions. Have a helper confirm each function works from outside the vehicle. Inspect the lens for cracks or moisture. Check that the housing is securely mounted and the leveling motor operates (if equipped).
Product Attributes
| Product Type | Front Headlight Assembly |
| Application | Front Lighting System |
| Vehicle Type | Van / MPV |
| Compatible Brands | Nissan |
| Compatible Models | NV350 Caravan E26 |
| Production Years | 2012 |
| Position | Front Left or Right |
| Lighting Technology | Halogen (H4) / LED (varies by configuration) |
| Functions | Low Beam, High Beam, Turn Signal, Position Light |
| Material | ABS Plastic |
| Voltage | 12V |
| Fitment Note | Verify specific fitment via VIN before ordering |
Notes:
-
This headlight is designed for Nissan NV350 Caravan E26.
-
⚠️ Different configurations (halogen vs LED, upper grade vs lower grade) use different headlights .
-
Please verify specific fitment via VIN before ordering.
-
Available for left and right sides.
Installation Guidelines
Tools typically required:
-
Socket wrench set (metric)
-
Screwdriver set
-
Trim removal tool (if needed)
-
Safety gloves
General installation reference (always follow vehicle-specific service manual):
| Step | Procedure |
|---|---|
| 1 | Park the vehicle on level ground and ensure the engine is off. |
| 2 | Open the hood and locate the headlight mounting bolts. |
| 3 | Remove the mounting bolts securing the headlight assembly. |
| 4 | Carefully pull the headlight assembly away from the body. |
| 5 | Disconnect the electrical connector(s) from the headlight. |
| 6 | Remove the old headlight assembly. |
| 7 | Compare the new headlight with the old unit to ensure identical fitment. |
| 8 | Connect the electrical connector(s) to the new headlight. |
| 9 | Test all light functions (low beam, high beam, turn signal, position light) before final installation. |
| 10 | Secure the new headlight assembly with mounting bolts. |
| 11 | Verify the light is flush and securely mounted. |
| 12 | Adjust headlight aim if necessary. |
Important:
-
Always disconnect the battery before working on electrical components.
-
Test all functions before fully securing the assembly.
-
Check the connector for corrosion or damage during installation.
-
If you are unsure about any step, consult a qualified mechanic.
Installation Tips & Common Mistakes
The Mistake When Replacing a Headlight Assembly:
❌ Wrong: Forcing the connector or failing to test all light functions before securing the assembly.
✅ Correct:
-
Test all functions before final installation – Low beam, high beam, turn signal, and position light should all work.
-
Check the connector pins – Bent or corroded pins cause intermittent light failure.
-
Use proper tools – Do not force plastic clips or trim pieces.
-
Check the gasket/seal – Ensure the new headlight seals properly against the body to prevent water entry.
-
Adjust headlight aim – After installation, adjust the headlight aim to avoid blinding other drivers.
⚠️ Remember: A headlight that is not properly sealed will allow moisture inside, causing bulb failure and corrosion. Always check the gasket condition.
Package Contents
-
1 × Front Headlight Assembly (Left or Right)
-
Protective packaging with label
Note: Bulbs may or may not be included depending on configuration. Mounting hardware is typically not included. Confirm with your specific seller.
After Replacement Still Having Issues?
Replaced the headlight but still having issues? Check these:
-
Is the connector fully engaged? – Loose connection causes intermittent light failure
-
Are the bulb/LED sockets clean? – Corrosion causes poor contact
-
Is the correct configuration installed? – Halogen vs LED must match vehicle wiring
-
Is the ground connection secure? – Poor ground causes dim or non-functioning lights
-
Is the fuse blown? – Check the fuse for the affected circuit
-
Is the housing sealed properly? – Improper sealing causes moisture and corrosion
-
Is the headlight aim adjusted? – Incorrect aim causes poor visibility or glare
Quality Assurance & Service Commitment
Quality Assurance:
Every component is manufactured under controlled production processes to ensure consistent dimensional accuracy and material integrity. Each unit undergoes the following quality checks before packaging:
-
Dimensional inspection – critical dimensions and mounting points are verified against design specifications
-
Lens inspection – lens clarity, color, and UV resistance are verified
-
Seal integrity check – housing seal integrity is confirmed
-
Function test – all light functions are tested
-
Leveling motor test – motor operation is verified (if equipped)
Packaging Protection:
Each headlight assembly is individually sealed in protective packaging to prevent contamination and physical damage during storage and transit. The packaging includes a clear label for easy identification.
Service Commitment:
| Commitment | Description |
|---|---|
| Pre-sale support | Fitment verification assistance – we help confirm compatibility before you order |
| Timely dispatch | Orders are processed and shipped within the stated handling time |
| Secure packaging | Protective packaging to prevent transit damage |
| Responsive support | Customer service inquiries are typically addressed within 24 hours |
| Fair resolution | Any issues with your order will be reviewed and resolved promptly |
Related Product Recommendations
When replacing the headlight assembly, it is often recommended to inspect and consider replacing the following related components at the same time.
| Product Name | Recommendation Reason |
|---|---|
| Headlight Bulbs / LED Modules | Replace all bulbs/LEDs for consistent illumination |
| Headlight Gasket/Seal | Prevents water entry and corrosion |
| Tail Light Assembly | Inspect for matching clarity and condition |
| Turn Signal Bulbs | Replace if amber lens appears faded |
| Headlight Leveling Motor | Replace if not functioning properly |
| Headlight Wiring Harness | Corroded or damaged wiring affects light function |
| Front Bumper Clip | Inspect for damage during headlight removal |
| Headlight Mounting Bracket | Replace if bent or damaged |
| Fog Light Assembly | Inspect for matching condition |
| Headlight Aim Adjustment Screw | Replace if stripped or damaged |
Recommended Products
